How to
Pick the job you’re doing. Each page’s own help is further down, and behind the at the top of that page.
Get going
Getting set up
Twenty minutes once, then it mostly runs itself.
- Tax settings
- Categories
- Import the bank
- Classify
- Tax settings: registered for GST or not, and how often you lodge BAS. Everything else depends on these.
- Categories: add the starter pack for your kind of work. They’re already matched to the tax return.
- Import transactions: export a CSV from your bank and bring it in. Start from the beginning of this financial year.
- Classify: file the lines in groups. Your choices become rules, so next month is quicker.
- Doing quotes and invoices? Fill in Invoice settings before your first one.
Don’t use jobs, vehicles or assets? Hide them in Settings. Less on screen, less to think about. The same goes for To-do, which is there for the jobs that aren’t bookkeeping at all.
Stuck on a page? Tap at the top of it.
A receipt, start to finish
The habit that saves your weekends: photograph it when you’re handed it.
- Take photo
- Trim the edges
- Check what was read
- Save
- On Home, tap Add receipt .
- Take the photo, trim the background, Use this image.
- The date, vendor, total and GST are read for you. Check them. What you type always wins.
- Pick a category, and a job if it was for one. Save receipt.
Later, Match receipts on the Bank page pairs it with the line that paid for it. Then it counts once, and the GST credit is backed by a real tax invoice.
Got it by email? On Android, share the PDF straight to this site. On anything else, Choose photo, image or PDF.
No signal? Add it anyway. It waits on your phone and is filed when you're back in range, marked Follow-up to check.
More: A receipt.
Sorting a bank statement
Ten groups at a time, biggest first. Stop whenever you like.
- Import CSV
- Classify groups
- Tidy up on Bank
- Match receipts
- Import transactions. Lines you already have are skipped, so overlapping statements are fine.
- Classify: pick a category for each merchant. Leave Remember for next time ticked, and next month files itself.
- On Bank, sort the leftovers one at a time. Mark private spending as personal.
- Match receipts to link receipts to the lines that paid them.
Filed a group wrongly? Undo straight after, or change the lines on Bank.
BAS time
Home tells you when one is coming. Here’s the run-through.
- Sort the period
- Check Needs attention
- Read the figures
- Lodge with the ATO
- Mark lodged
- Sort any bank lines in the period. Home’s Next card takes you to Classify.
- Open Tax and clear Needs attention.
- Under BAS periods, read G1, 1A and 1B for the quarter.
- Lodge with the ATO, through your accountant or online services.
- Back here, Mark lodged with what you lodged. The period locks, so the figures stay put.
- When you pay, add the Paid on date.
Estimated GST credits are purchases with no receipt behind them. Link receipts to replace them before you lodge: a credit needs a tax invoice.
Not registered for GST? You don’t lodge BAS unless you’re in PAYG instalments.
Tax time
The year’s figures, laid out the way the tax return asks.
- Clear Needs attention
- Year-end details
- Year-end pack
- To your accountant
- Open Tax on the year that’s ended.
- Clear Needs attention: unsorted lines, gaps between statements, categories with no tax item.
- Fill in Year-end details: stock, what’s owed to and by you, anything paid to family or a related business. Leave what doesn’t apply.
- Confirm your working-from-home months. Confirmed hours fill in by themselves.
- Check Depreciation for your equipment.
- Year-end pack for your accountant: figures, a ledger of every line, and every receipt file, in one ZIP.
Or skip the ZIP: give your accountant their own sign-in (see Sharing with your accountant).
From enquiry to paid
One job holds it all: the request, the sketch, the quote, and every invoice.
- New request
- Photos and sketches
- Quote
- Accepted
- Deposit
- Balance
- Paid
- On Jobs, tap New request. Note what they want and who they are.
- Next: photos and sketches. Photos from the site visit, or a sketch with the stylus.
- Next: the quote. Add the lines, tick the sketches to print, preview, Issue quote, send it.
- They say yes: Mark accepted. They can sign on your tablet. The job is now on.
- Invoices from this quote: a deposit, progress payments, then the balance. Each is a draft to check, then issue.
- When money arrives, link it to the invoice on Bank. The job shows what’s been paid and what’s owed.
Receipts and bank lines for materials go on the job too, so you can see what it really cost.
More: A job or request, A quote, An invoice.
Vehicles and working from home
Two records the ATO wants kept as you go. A few taps a week.
Vehicles
- Add the vehicle
- Log trips
- 12 weeks done
- Share used for five years
- Vehicles: add it by registration.
- After each trip, Add journey. Photograph the odometer to skip typing.
- Other drivers? Share the vehicle, or print a QR code for the dash.
- Keep it up for 12 weeks in a row, and that business share can be used for five years.
Working from home
- Set your usual week
- Fix the odd day
- Confirm the month
- On Home, Set your usual week.
- Once a month, open the Working from home card, fix any day that was different, and Confirm.
- The hours flow into the tax year by themselves.
Sharing with your accountant
No emailing spreadsheets. They sign in and see it live.
- Add their email
- Choose what they see
- They sign in
- They switch to you on Home
- In Settings, under People with access, add the email they sign in with.
- Choose each area: No, Read-only, or Yes to let them make changes. Read-only suits most.
- No login yet? They can make a free one; Settings shows the link to send.
- They pick your business on their Home page, and see what you’ve allowed.
You can change or remove their access any time. Nothing of yours is deleted.
See who changed what: History, at the foot of each record.
For accountants: set Your practice in Settings. Clients add you by your sign-in email. With many clients, Home’s Change lets you type part of a client’s name to find them.
Before you check a set of books, read How the figures are worked out. It sets out the basis, the GST treatment, the depreciation and vehicle rules, and what the tool deliberately leaves to you.
How the figures are worked out
The rules the tool follows, for context at review time. Checked against the app on 21 September 2026.
Not tax advice: whether these rules suit a particular business is your call.
Cash basis
A figure moves when the money does.
- A bank line counts on its transaction date.
- A receipt with no bank line counts on its paid date, or its own date if there isn't one.
- A bill with a pay-by date isn't an expense until it's paid.
- An invoice is never income. The payment against it is.
- Cash taken or paid without a bank line is recorded on the day it happened, and counts then.
No accruals option. A business reporting on accruals, or carrying enough trading stock to matter, needs its figures adjusted at year end.
What's counted, and what isn't
Left out of income and expenses entirely:
- lines marked personal;
- both halves of a transfer between the business's own accounts, once paired;
- anything in a category mapped to Not income or expense (drawings, loan repayments, tax payments);
- anything private, not deductible, such as entertainment;
- equipment, which is claimed through the asset register instead;
- things claimed elsewhere on the personal return: tax agent fees, the owner's own super, donations.
Anything unsorted is listed, never guessed: it appears under Needs attention with its amount and stays out of every total.
Left out of the income-tax figures is not the same as no GST credit. Equipment and tax agent fees are creditable; private spending and drawings aren't.
GST
Only when the business is registered, and only from the date it registered.
- G1 is money in on income categories, GST-free sales included.
- 1A is the GST on those sales. A payment against an issued invoice takes that invoice's GST in proportion, so a deposit carries its share. Anything else in a GST category is estimated at 1/11, and the estimated part is reported separately.
- 1B is the GST printed on the receipt, where there is one, in Australian dollars and marked GST. Where there isn't, 1/11 of the spend is estimated, again reported separately.
- Credits follow business use: a category at 60% business claims 60% of the cost and 60% of the GST.
- Purchases over $82.50 including GST need a tax invoice. Estimates on those are shown but held back from what's payable, so the amount to pay is one the business can stand behind. Estimates under $82.50 count, because no tax invoice is required for them.
- An international transaction fee attached to a purchase carries no GST.
- Adjustment notes record what came off an invoice after it was issued. They're documents, not figures: the refund's own bank line is what moves G1 and 1A.
Equipment and depreciation
Simplified depreciation for small business:
- an asset costing under the instant write-off threshold is written off in the year it was bought;
- anything else goes to the small business pool: 15% in the year it's added, 30% of the opening balance after;
- the whole pool is written off once its balance falls under the threshold;
- a pool balance brought in from a previous return is entered by hand, and assets bought before that year are taken to be in it;
- cost is less GST where the business is registered, times the asset's business-use share;
- a car over the year's car limit has its cost cut to that limit before GST comes off, so the credit is 1/11 of the limit and the cost base is what's left;
- selling a written-off asset is assessable in full.
No pro-rating by days held, which is correct under these rules.
Vehicles
- The logbook share is business km over everything the car travelled, taken from the odometer readings, not over the trips that happen to have been logged. Km the odometer moved with no journey against them count as private.
- A logbook needs 12 weeks of trips and holds for that year and the next four.
- Cents per km claims the year's rate for up to 5,000 business km, in place of the car's actual costs, which all go to private.
- GST on a car's running costs follows actual business use, which is a separate question from the income-tax method. With no logbook, nothing is claimed rather than a figure being assumed.
- One car used by two separate businesses is modelled. A journey records which business it was for, so each claims its own business km, and both shares come out of the same denominator: every km the car travelled. The two business shares, private use and unlogged km therefore come to 100%, and neither business can claim the other's work. A trip counts for the business of whoever logged it; the car's owner can say a trip was for the car's own business instead, and nobody can attribute a trip to a third party. Only the car's holder depreciates it and claims its GST; the other claims its own business use of the costs it actually paid, or cents per km, which is per taxpayer, so each can claim up to 5,000 of its own business km in the same car.
Working from home
The ATO fixed rate, applied to confirmed hours from the daily log, and booked under All other expenses. The rate covers power, phone, internet, stationery and computer consumables, and the app points out any category claimed that the rate already covers. Occupancy costs are not offered.
Trading stock
Opening and closing stock are entered by hand at year end and move cost of sales: purchases plus opening less closing. The valuation basis (cost, market selling value, replacement) is recorded alongside.
GST instalments (the ATO's option 3)
Where the business pays a quarterly instalment the ATO sets and lodges one GST return a year:
- a quarter owes the amount on the notice (G21), whatever that quarter's figures came to. Its G1, 1A and 1B are still worked out and shown, so the instalment can be seen to be tracking or not, but they aren't what's paid and nothing is lodged for a quarter;
- the year is a return: G1, 1A and 1B for the whole year, the instalments credited at 1H, and the difference as a balancing payment or refund. It's the only period recorded as lodged, and the lock it takes covers the year;
- 1H is the instalment times the quarters it was asked for, so registering part-way through the year counts fewer. It can be corrected on the return where the ATO changed the amount mid-year;
- PAYG instalments sit on the quarterly notice, not on the GST return;
- the app does not vary the instalment (G22, G23 and a reason code). Instalments totalling under 85% of the year's actual GST can attract a penalty, and paying the advised amount never does, so the variation is left to the business and its accountant.
Last checked against the app on 21 September 2026.
Rates the app ships
Cents per km, the working-from-home rate and the car limit are held per financial year and checked by hand each year. A year the app has no figure for claims nothing, rather than guessing, and the business can enter the published figure itself under ATO rates in Tax settings. What's entered wins for that business and that year only.
What this tool deliberately doesn't do
- Payroll. No wages, PAYG withholding, W1 and W2, Single Touch Payroll or super guarantee. It's for a sole trader who pays themselves. Paying contractors is covered.
- Accruals. Cash basis only, as above.
- Income tax. No rates, brackets, offsets or estimates of what's owed. The figures are laid out the way the business schedule asks; the return itself is someone else's job.
Checking the work
- Needs attention on the Tax page lists everything unsorted, every gap between bank statements, and every figure the app couldn't work out. It's the first thing to clear.
- Export to Excel gives the whole year, with a ledger of every line showing its category, tax return item, GST treatment, business-use share and estimated GST.
- The accountant pack adds every receipt file and a note of how the figures were worked out on the day it was made.
- History, at the foot of each record, shows who changed what and when.
If a figure on screen doesn't match what's written here, this page is the bug: it's updated whenever a rule changes.
Taking everything with you
Your records are yours. One ZIP, whenever you want it.
- Settings
- Export everything
- Download ZIP
- Settings, Your data, Export everything.
- Untick anything you don’t need, then Make the export.
- Leave the page if it’s a big one. Come back and Download ZIP.
Inside: spreadsheets that open in Excel, with photos, drawings and PDFs in folders, and a README saying what’s where. It’s kept for 48 hours after it’s ready.
What we keep, and for how long
Your records stay while your account does. Nothing is tidied away or aged out: the ATO expects five years, and that’s your obligation, so losing them early isn’t ours to do.
What you delete is different. A deleted receipt is gone, its photo with it, which is why every delete asks first. Receipts and bank lines inside a BAS period you’ve lodged can’t be deleted at all.
Closing your account
Export everything first, then ask and it’s removed: your records, your files, your sign-in. Backups are the one thing that isn’t instant, and the last of them ages out a week later.
Your journeys in somebody else’s car stay in their logbook, because their odometer and their figures depend on them.
Every page
Home
Your starting point. It shows the one thing worth doing next, and the latest of everything else.
Quick start
- Tap Add receipt the moment you’re handed one. That’s the habit that saves the weekend.
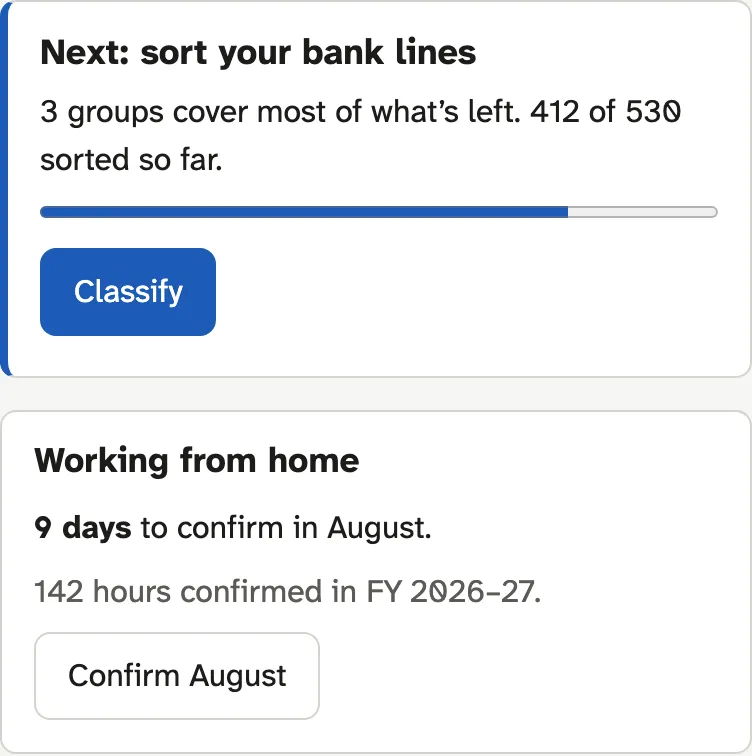
- Do the Next card if there is one. It’s the most useful job right now: a BAS coming due, one to pay, or bank lines to sort.
- Glance at the cards below it. Each one links to its page.
The Next card
Only one thing shows at a time, in this order:
- BAS due soon: sort any bank lines in that period, then open Tax to see the figures.
- BAS to pay: it’s lodged but not marked paid.
- Sort your bank lines: there are lines without a category.
Nothing there? You’re up to date. Enjoy it.
Put aside for BAS
If you're registered for GST, this is roughly what the BAS will ask for so far: GST on your sales less the GST on your purchases, from what's sorted. Move it somewhere safe as it comes in, and the BAS is no shock. Sort the rest of your bank lines for the full figure.
Money owed
What customers still owe you, with the overdue ones first. Send a reminder opens your own email app with the reminder already written, including how to pay. You check it and press send.
Coming out
What's due to go out in the next month: bills still to pay, reminders with a cost, and regular payments you've confirmed ("about" means the amount is an estimate from earlier ones). Underneath, how much to put away each month so costs like rego and insurance are covered when they come round. It's each cost spread over the months until it's due, including regular payments made every 3 months.
When payments in your bank lines look regular, a line here links to them to check.
Coming up
Reminders without a cost that are due in the next month, or already past: vehicle registration and servicing, asset test and tag, and the business's own, like a domain name or fire inspection. Add them on each vehicle or asset, or in Settings for the business.
Working from home card
- Set your usual week once, and the days fill themselves in.
- After that it tells you how many months are waiting to be confirmed. One tap opens the oldest.
- Don’t work from home? Tap I don’t work from home and the card goes away.
Cash
Cash beside Add receipt opens a screen made for a thumb: which way, how much, what it was. It's for money that never reaches a statement, and it works with no signal. Got the receipt? Add the receipt instead and choose Paid in cash. See Cash.
To-do
The next few things on your own list, with their project and due date. Tap one and it opens on the To-do page ready to change; Add task beside Add receipt takes you straight to the box. Ticking off happens there.
With no signal
Your phone keeps a copy of three pages: this one, Add receipt and To-do. With no signal, the app opens here and says when the copy was taken.
What's left on screen is what still works: Add receipt, Add task, your tasks and your latest expenses. The menu keeps only those three pages, and anything carrying a figure (put aside, money owed, coming out, coming up) is hidden rather than shown as though this morning's number were today's. Names that would be links are plain words, because there's nothing behind them yet.
A receipt or a task you write there waits on the phone and is sent the moment you're back on. Everything comes back on its own when the signal does.
Working for more than one business
If someone has shared their account with you, their names show as buttons at the top. Tap one to switch. The name in the header shows whose records you’re in, and tapping it brings you back here to switch.
With more than five accounts, there’s one line instead: Working in, then the name, and Change. Tap Change, then type part of a name in Find a client and press Enter, or scroll the list and tap one.
Expenses
Money going out: every receipt you’ve kept and every bill to pay, a month at a time. Money coming in is under Sales.
Quick start
- Tap Add receipt to photograph or upload a new one.
- Tap a receipt to check or change it.
- Use Filter to find one by date, vendor, category or words in its description.
Finding things
- Filters apply as you change them. Clear filter puts everything back.
- Only ones needing follow-up shows the receipts you flagged, with the note you left yourself.
- Export to Excel saves what’s showing, filter and all.
- and set the spacing between lines: compact, normal or relaxed, on this device. Bank, Receipts and Classify share it.
Deleting
Tap beside a receipt, then tap it again to confirm. The image goes too, and it can’t be undone.
A receipt in a lodged BAS period can’t be deleted until that period is unlocked on the Tax page. That keeps what you lodged matching your records.
A receipt
Photograph it, check what was read, save. Most receipts take under a minute.
Quick start
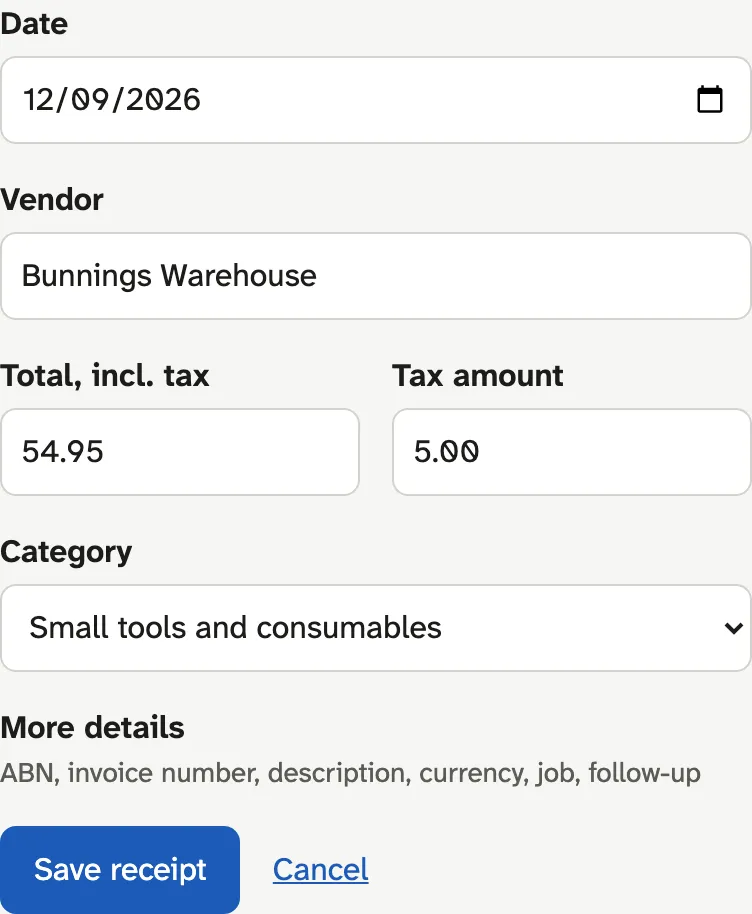
- Take photo , or Choose a file (a photo, image or PDF). No file? Type it in.
- Check the picture: upright, sharp, total readable. Trim the background with the frame’s edges, then Use this image.
- While it’s read, you can start typing. When it’s done, check the date, vendor, total and tax amount.
- Pick a Category and tap Save receipt.
Taking a good photo
- Flat, well lit, the whole receipt in frame. Torch helps in a dark ute.
- Long receipt? Get the top and the total in. The middle matters least.
- Pinch or scroll to zoom, drag to move, double-tap to zoom in or out.
- Sideways? turn it upright.
- Receipt from tells the reader which country’s format to expect. It matters for dates and currency.
From email or another app
On Android, share a PDF or photo from an email or your files straight to this site. It opens as a new receipt, ready to check.
Paid in cash
Under Is it paid?, Paid in cash files the receipt and takes the money out of your Cash account in one go: the line is made for you, tied to this receipt, and dated and named from it. The receipt then stops waiting to be matched to a bank line, and the cash you have left is right.
Change it back to Paid (a receipt) and that line is removed again.
No signal
Add receipts as usual: take the photo, type what you know (or nothing) and save. They wait on your phone and are read and filed when there's signal, then show in Expenses marked Follow-up so you can check them. Open the site on this phone once while you have signal, so it works without.
With no signal, any page that isn't kept on your phone opens your home page instead and says so. Reloading tries the page you wanted again.
More details
Tap More details for the ABN, invoice number, description, currency, job and follow-up.
- ABN: checked against the Australian Business Register, which shows the registered name.
- Job: type to find one. Open jobs come first.
- Needs follow-up: tick it, or just write a note saying what’s needed. The note alone flags it.
- Currency: if the reader thinks it’s not in dollars, it offers to switch. Your call.
Save receipt waits for you
It stays greyed out until there’s at least a vendor or a total, and the amounts look like amounts. The note under it says what’s missing.
A bill still to pay
Got an invoice from a supplier that you'll pay later? Under Is it paid? choose A bill to pay and set Pay by. When the document shows a due date, that's filled in for you. The bill shows on Home under Coming out until it's paid.
- Paid from the bank: link the bank line (Match receipts does it for you). That's all.
- Paid another way (cash, a personal card): press Paid beside it on Expenses or Home. Press it again to undo. Or set Paid on in More details.
Until it's paid it isn't counted as an expense, because the Tax page counts money when it moves.
Already saved?
If a new receipt has the same total, business and date (give or take a day) as one you've saved, it says so before saving. Open the saved one to check, or tick It’s a different receipt and save. It stops the same receipt being claimed twice.
Equipment
Bought a tool or anything kept for more than a year? Add to assets puts it in the asset register, linked to this receipt.
When things go wrong
- Nothing was read: type it in, or just save. The photo is kept and read again when it can be.
- Wrong total: fix the number. What you type always wins.
- It’s locked: the receipt is part of a lodged BAS. Unlock that period on Tax to change the date or amounts.
Categories
What you file receipts and bank lines under. Each one knows where it goes on the tax return and how GST works for it. Find it under Settings, Categories, with a link to your bank rules.
Quick start
- New here? Open a Starter pack for your kind of work, tick what you want, Add selected.
- Add your own with New category and Add category.
- Check each category’s Tax return item and GST, then Save tax treatment.
Starter packs
Ready-made for trades, cleaning, creative and professional work, already matched to the tax return and GST. Only everyday purchases are switched on for receipts. You can add a pack later, and it skips what you already have.
What you sell is the income pack: classes and workshops, repairs and servicing, stock sales, commissions, hire, delivery charged, interest received. Splitting income this way is what makes the Tax page show what’s selling. Every one of them still counts as business income on the return.
Receipts
The Receipts chip says whether the receipt form offers a category. Press it to turn it on or off; it saves where you are, so you can work down the list without the page moving.
Tax treatment
- Tax return item: which line of the business and professional items it counts toward. Under Not counted: *Not income or expense* is transfers, loans and drawings; *Equipment (asset register)* is claimed through the asset register instead; *Claimed elsewhere on your return* is things like tax agent fees, your own super and donations.
- GST: whether the price includes GST you can claim. A category is all one or the other, so if some of what you sell is GST-free, give it its own category rather than mixing the two.
- Business use: for things that are partly private, like a phone at 60%. Only that share is claimed, cost and GST.
- Vehicle: with more than one car, which car’s logbook applies.
A category with no tax return item shows under Needs attention on the Tax page, so nothing slips through uncounted.
Paying staff
This is built for a sole trader who pays themselves and their own super, so there's no category for wages. If you take someone on, you need PAYG withholding, W1 and W2 on your BAS, Single Touch Payroll and super guarantee, and none of that is here: that's a job for payroll software or your accountant. Paying a contractor is different, and Contractors and subcontractors covers it.
Deleting
Tap twice. Receipts that used it keep their details but lose the category.
Bank
Your bank statement lines, so every dollar in and out is accounted for.
Quick start
- Import transactions (under More) to bring in a CSV from your bank.
- Classify to sort them in groups. It’s much faster than one at a time.
- Come back here for the odd ones: pick a category, link a receipt, put a line on a job.
One line at a time
- Category: choose from the list. It saves straight away. Money that came in leads with what you sell, money that went out with what you buy; the other end is still in the list, for a refund that belongs back on its cost.
- Use for all (merchant), and remember: files every line from that merchant and makes a rule for next time.
- Personal: a private purchase on the business account. It stays out of the business figures.
- Tap the chevron for more: the job, the invoice it paid, a description, and Add to assets for equipment.
Receipts and bank lines
Match receipts, under More, pairs receipts with the lines that paid them: same amount, within three days. A matched pair counts once, not twice.
To pick one by hand, open the line and choose the receipt. Unlink undoes it.
Finding things
- The FY tabs switch year. All years shows everything.
- Filter by date, whether it’s classified, job, or words in the details.
- Filter, Show: what’s left to sort, what’s done, or everything. The Filter button says what’s shown while it’s closed.
- Apply rules, under More, runs your remembered rules over anything still unsorted.
- Regular payments, under More: rent, insurance and bills that come round again, for Home's cash plan. See Regular payments.
- and set the spacing between lines: compact, normal or relaxed, on this device. Bank, Receipts and Classify share it.
Undo
Filed a whole merchant by mistake? Undo appears at the top afterwards and puts those lines back as they were.
Your accounts
More than one bank account in the business? Each line carries the account it came from, and More › Your accounts names them: the importer often knows an account only by its number, so give it a name once and every line moves with it. Two accounts given the same name become one. See Import transactions for how a file's own account is recognised.
With more than one account, a row of buttons under the year says which one you're looking at: All accounts, then each by name. It narrows the list, the totals and the Excel export, and stays where it is while you work.
Categorising doesn't change: your rules and the merchants you've already sorted apply across every account, so a new one needs nothing set up.
Cash
Cash never reaches a statement, so it's typed in: Record cash, which is a screen made for a phone. Which way, the amount, what it was, and a category if you know it. It goes into an account called Cash, which then sits beside your bank accounts like any other, and it works with no signal.
A cash line is an ordinary line: your rules and categories apply to it, it can belong to a job, and the receipt for what the cash bought can be tied to it the same way. Because it was typed rather than imported, it can also be deleted, which an imported line can't.
It's for cash with no paperwork behind it: market takings, a tip, petty cash. A sale you've already marked as paid in cash on its invoice is counted there, so don't add it here as well.
Transfers between your accounts
Money you move between your own accounts is on both statements, once out and once in, and it's neither income nor spending. When two lines look like the two halves of one move, they're offered above the list: same amount, opposite ways, different accounts, within a few days. Pair these ties them; Not a transfer leaves them for now, and classifying either one settles it for good.
A paired line says Transfer out or Transfer in with the other account's name. It stays on the statement, so the balance checks still work, but it's out of the money in and out, out of the list to classify, and out of the tax figures. Its More has Not a transfer if you change your mind.
International fees
A foreign transaction fee is paired with the purchase it belongs to and takes its category, so you don’t sort it twice.
Tags on a line
- Lodged: the line is part of a BAS you've lodged, so it can't change. Tap it to go to the Tax page, where the period can be unlocked.
- Set aside: you put it aside on Classify to do by hand. Choose its category here.
Import transactions
Bring in your bank statement: the file your internet banking exports, as it comes.
Quick start
- In your internet banking, export the account’s transactions. CSV, Excel, OFX (also called QFX or QBO), QIF and the statement itself as a PDF all work.
- Choose the file here and tap Continue.
- Check the first lines, shown as they’ll be saved: money out as minus, money in as plus.
- Tap Import.
Which file to choose
Any of your bank’s export options works. If you’re offered a choice:
- CommBank, Westpac, St.George, Bank of Melbourne, BankSA: CSV or OFX.
- NAB, ANZ, ING, Macquarie, Bankwest, Bendigo, Up: CSV.
- Another bank: CSV, or OFX if it’s offered.
A CSV opened in Excel and saved as Excel (.xlsx) works too.
PDF statements
A PDF works when it’s the statement your bank made: one where you can select the words. A scan or a photo of a statement doesn’t; export CSV or OFX for that period instead.
- Each line is checked against the balance printed beside it. If any don’t add up, the page says how many, so you can check them against the statement.
- Several accounts in one statement (a spending account and its savers) are listed with a tick each. Untick any you don’t want to import.
- Round-ups and money forwarded to a saver come in as lines of their own, so a purchase keeps its real amount and still matches its receipt. Up’s CSV and OFX work the same way, so a month is the same whichever file you import.
Importing again
Import the same statement, or one that overlaps, as often as you like. Lines you already have are skipped, so only new ones are added. That holds across formats too: a month imported as CSV and again as OFX isn’t added twice.
Columns
The columns are matched from their headings, and your choices are remembered for next time. Each match says why it was made.
- Amount can be one column (minus for money out), or two: Money out and Money in. Minus signs, brackets, CR and DR are all understood.
- No heading row (CommBank and ANZ export none): the columns are worked out from the lines themselves.
- Balance: when there is one, it’s used to check which way the money goes. If a file has money out and in the other way round, the balance shows it and they’re swapped to match your bank.
- Merchant: taken from its own column when the file has one, otherwise from the description (“V1234 13/09 SAMPLE CAFE” becomes “Sample Cafe”). Where that column is blank, the description is read instead. BPAY has none.
- Money sent to you: banks put the sender’s name in a fixed-width field and run their reference straight on from it (“THERESE RULESea glass earrings.”), so the name is read off the front. One person paying for three different things is one payer, not three.
Which account
When the file doesn’t say which account it’s from, give it a name, like “Everyday” or “Business card”. It keeps each account’s statements apart, so the Tax page can check each one for gaps. The box offers the names you already use, and it remembers: the next file of the same kind, from the same bank, comes back with the same account filled in, and says so.
When the file does say, it usually says it as a number. File it under gives that number a name, once. Later files of that account know the name, and the lines already filed under the number are renamed with them, so the account's history stays in one piece. The import says how many were moved.
Renaming an account later, and switching between them while you work, are on the Bank page. If the file is for an account this business has never imported, it says so before anything is filed. Where the same login can open another business that does import it, it names that one too, so a statement uploaded into the wrong business is caught before it lands. It's a warning, not a wall: import anyway if it's right.
When things go wrong
- Dates look wrong: check the Date column is the transaction date, not a processing date. Dates are read day first, unless the whole file shows it writes the month first.
- Balances missing: fine, but the Tax page can’t then spot a gap between statements.
- A column is matched wrongly: choose the right one. The lines are read your way when you import, and your choice is remembered.
Cash
Money that never reaches a statement: takings from a stall, a tip, something paid for from the tin. Record it here and it behaves like any other line on Bank.
- In or out
- The amount
- What it was
- Record it
Recording one
Money out for cash you paid, Money in for cash you took. Then the amount, what it was for, and the date, which starts at today. A category is optional: your rules and the merchants you've already sorted fill most of them in later anyway.
After it saves, the amount and the words clear and the cursor is back in the amount, because cash usually comes in runs.
It goes into an account called Cash, beside your bank accounts. Rename it, or work on one account at a time, on Bank.
Got the receipt?
Add it as a receipt instead: Add receipt, then choose Paid in cash. The cash line is made for you and tied to the receipt, so the photo, the ABN and the GST are all kept and nothing is counted twice.
With no signal
The page opens from the copy your phone keeps, and what you record waits on the phone until you're back on. It says so at the top, and each waiting line is listed under the form until it lands. Nothing is lost if you close the app.
Fixing one
A line you typed can be deleted from its own row on Bank, which an imported line can't. Everything else about it, the category, the job, the receipt, is changed there too.
Classify
Sort bank lines in groups instead of one by one. Ten groups at a time, biggest first.
- Pick a category
- Check the lines
- File them
- Remembered next time
Quick start
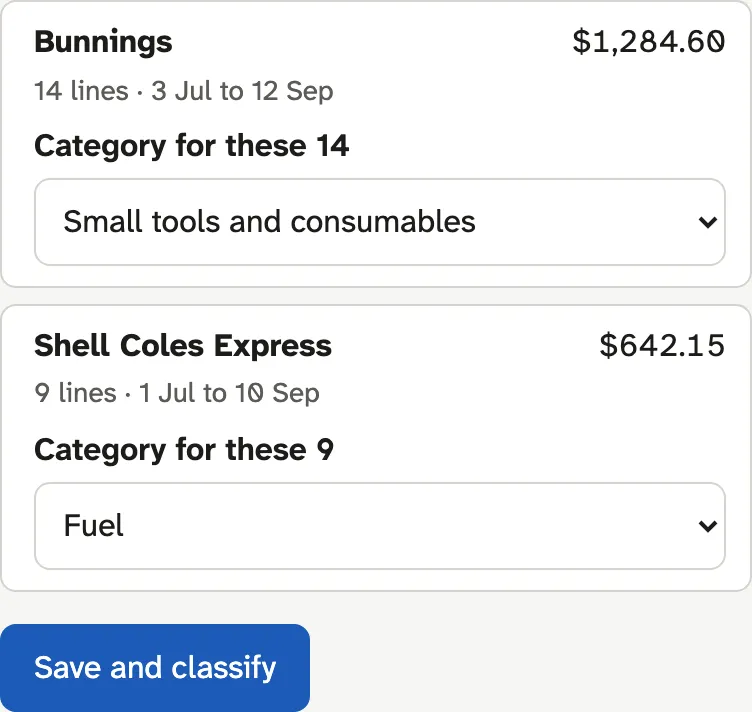
- Each card is one merchant, or one description, with how many lines and how much.
- Pick a Category for it. Skip any you’re not sure about.
- Tap Save and classify.
- Check the list that pops up. Untick any line that doesn’t belong, then file them.
- Next brings up the next ten.
Money in, money out
The list follows the group. Money that came in leads with what you sell: classes, repairs, stock. Money that went out leads with what you buy. The other end is still there, further down the list, because a refund from a supplier belongs back on the cost it reverses.
Remember for next time
Leave it ticked and a rule is made. New lines from that merchant are filed as they’re imported, and Apply rules on the Bank page runs them over anything still unsorted. Your rules are listed at the bottom, and deletes one; the lines it already filed stay as they are. A category given on Regular payments makes the same kind of rule.
What filing does
Lines are grouped by merchant where the bank gave one, otherwise by their description. Money someone sent you is grouped by their name, which banks run straight into the payment reference, so every payment from one person lands in the same group. A choice files every line in the group, and a fee follows its purchase. Lines you've already classified are never changed, and Undo puts a group back.
Set aside
A line you untick stays unsorted and no rule will file it. Sort those on Bank, where you can see each line’s detail.
Progress
The count at the top shows how many lines are sorted out of the total. It saves as you go: stop whenever you like.
and set the spacing between groups, on this device.
Locked lines
Lines in a lodged BAS period are locked and left out. Unlock the period on Tax to sort them.
Regular payments
Rent, insurance, subscriptions and bills that come round again. Once you confirm one, Home's Coming out shows when the next is due and how much.
- Found in your bank lines
- This is regular
- On Home before it's due
- Filed as it comes in
How they're found
A payment to the same place three or more times, at a steady gap (weekly, fortnightly, monthly or every 3 months), shows under Look regular. Reference numbers in the bank's description are ignored, so a bill with a new reference each time still counts as one supplier. A payment that has stopped (nothing for two gaps in a row) isn't suggested.
Yearly costs such as rego or insurance renewals go in Reminders instead: on the vehicle, the asset, or Settings.
Confirming one
- Pick a Category. It files the earlier payments now and new ones as they're imported, the same as a rule on Classify. Undo puts the earlier ones back.
- Tap This is regular. It waits until a category is chosen, so a regular payment always files its own lines.
Where a payment's description changes every time, there's nothing to match on, so it has no category and the button doesn't wait.
Not regular hides a suggestion for good. They're listed at the bottom, and Suggest again brings one back.
The amount
- The same amount three times running is shown as it is.
- Otherwise it's an estimate, marked "about": the amount that came up most lately; or, with a year of statements, what it was this time last year (a winter gas bill looks like last winter's); or the average of the last three.
The next date follows the last payment in your statements, so import them now and then and it stays right. Anything paid every 3 months also adds to Put away on Home, spread over the months until it's due.
When one stops
Ended takes it out of the cash plan but keeps it, so it isn't suggested to you again as if it were new. Ended ones are listed at the bottom:
- Start again puts it back.
- forgets it, so it can be found afresh later.
If payments start again by themselves, it comes back under Look regular saying so, with its category ready.
A category you gave it stays as a rule either way; delete that on Classify if you don't want it.
Tax
This financial year, laid out the way BAS and the tax return ask for it.
Quick start
- First visit: answer the two questions (GST, and how often you lodge).
- Clear Needs attention. Every item has a button that takes you to the fix.
- Read your figures under BAS periods and Income and expenses.
- When you lodge, Mark lodged so that period is locked.
Needs attention
What would make the figures wrong or incomplete: unsorted bank lines, categories with no tax treatment, gaps between bank statements, receipts in another currency. Sort these first; they aren’t in the figures until you do.
The figures count money when it moved: bank lines, and receipts paid another way. Personal bank lines are left out. Anything unsorted is listed here rather than guessed.
Equipment and things claimed on your own return, like tax agent fees, sit under Left out because they aren't business expenses on this page: equipment is claimed through the asset register instead. Their GST is still claimed at 1B, because that's a separate question. Private spending and drawings are left out of both.
One main client: when most of the year's income came from one client for your own skills or effort, the personal services income (PSI) rules may apply. Talk to your accountant, then mark it discussed. Shares are of the money that came in, so a refund you paid a customer back shows as money back rather than a share.
Bills not yet paid
A bill you've saved with a Pay by date isn't an expense until it's paid: from the bank (link the bank line), or on the Paid on date you give. Then it counts in the period it was paid.
BAS periods
G1, 1A and 1B for each period, with its due date. Home reminds you when one is close.
Cars claimed by cents per km, and hours worked from home, are claimed at the ATO rate for that year. A year the app doesn't have a rate for claims nothing until you enter it under ATO rates in Tax settings.
Estimated GST is 1/11 of a purchase with no receipt to take the GST from.
Under $82.50 the ATO doesn't need a tax invoice, so those estimates count in To pay. Over $82.50 one is needed, so those are left out of To pay until you link a receipt: the page says how much is waiting, and lists those purchases first. That way the figure you lodge is one you can stand behind, and finding a receipt only ever moves it in your favour.
On GST instalments the quarters are the ATO's amount to pay, with nothing to lodge, and the year's GST return is the one that reconciles them: see Tax settings.
The due dates are for lodging yourself; a tax agent's are often later. A yearly GST return is dated for 31 October, when you lodge a tax return too; it's 28 February for the rare business that doesn't have to lodge one.
Lodging
- Mark lodged records what you lodged. The figures start as today’s; change any to match.
- A lodged period is locked: its receipts and bank lines can’t change.
- Found a mistake? Unlock to correct, fix it, Lock again. Correct the difference on your next BAS.
Year-end details
Things the return asks for that bank lines can’t give: stock, what customers and suppliers owed, and hours worked from home. Leave any that don’t apply empty.
- On the page they have plain names; your accountant knows them as trade debtors (owed to you), trade creditors (you owed suppliers) and payments to associated persons (family or related businesses).
- How stock is valued: at what it cost you, at what it would sell for (market selling value), or at what it would cost to replace. Most use cost.
- PAYG instalments paid through the year are claimed back as a credit on the tax return.
- The income and expense lines follow the ATO's business and professional items; for a company or trust your accountant carries them to its own return.
For your accountant
- Export to Excel: the whole year in one workbook, same figures as the page.
- Accountant pack: the year-end figures, a ledger of every line, and every receipt file, in one ZIP. It asks first, and says what it’s about to gather: it can take a minute, and the download starts when it’s ready.
Not registered for GST?
No GST, no BAS, unless the ATO has put you into PAYG instalments. Set that in Tax settings.
These are your figures
This page works out what your own records add up to, the way the ATO's forms ask. It isn't tax advice, and it can only be as right as what's been sorted: check it before you lodge, and take anything you're unsure of to your accountant.
Tax settings
The few facts every tax figure depends on. Set them once, under Settings, Tax.
Quick start
- Registered for GST? Yes or no.
- How often do you lodge BAS? Monthly, quarterly or yearly.
- Business structure and Main business activity. Working for yourself with an ABN and no company is a sole trader. The main activity is a few words on what the business mostly does: the tax return asks for it.
- Save tax settings.
GST
- Registered from is only needed if you registered part-way through your records. BAS periods before it are left out, and invoices dated before it don't charge GST.
- How often do you lodge BAS? Most small businesses lodge quarterly. Your ATO letter says which.
- Not registered and not in PAYG instalments? There’s no BAS, so the lodging question is switched off.
PAYG instalments
Only if the ATO has put you into them. Your instalment notice or activity statement says whether it’s an amount each period (option 1) or a rate (option 2). Pick that and enter the figure. When the ATO sends a new notice, update it here.
Industry code
The ATO’s 5-digit business industry code. Optional; your accountant can fill it in, or search “ATO business industry codes” to find yours.
ATO rates
Two rates the ATO sets each year: cents per business km for a car claimed that way, and cents an hour worked from home. Both are filled in for you, and most years you never touch them.
Open ATO rates and you get a row per financial year, each saying where its figure came from:
- The ATO's published rate: what this app shipped with. Leave it.
- Your own figure: you changed it.
- Not published when this version was made: the box is empty, and nothing is claimed at that rate until you fill it in.
The ATO publishes a year's rates near the end of that year, so there's a stretch where your claim is ready and the app's figure isn't. Type the rate in and it's used straight away, for this business only. Clear the box to go back to the app's.
Changing a rate for a year you've already lodged changes that year's figures. The Tax page says so under Needs attention, the same as any other change after lodging.
GST instalments
A different scheme from the PAYG instalments above, with its own numbering: the ATO calls it option 3 for GST. You pay a quarterly amount the ATO sets and lodge one GST return a year.
Choose GST instalments, yearly return and enter the amount from your notice, the figure at G21. Then:
- each quarter shows that amount and when it's due. There's nothing to lodge for a quarter;
- the year's GST return shows your real G1, 1A and 1B, credits the instalments at 1H, and gives the balancing payment or refund. That's the one you mark lodged;
- if the ATO changes your amount part-way through, correct 1H on the return.
Your figures often run ahead of the instalments. The Tax page says by how much, and Home keeps that aside for you, so the balancing payment isn't a surprise when the return is due.
Varying the instalment is not something this app does. You can ask the ATO to change the quarterly amount, but if your instalments come to less than 85% of the year's actual GST there can be a penalty, and paying the amount they advise never attracts one. That's a conversation for your accountant.
Working from home
Your hours go in the working-from-home log, not here. The rate they're claimed at is under ATO rates above.
Working from home
A record of the hours you worked at home, for the ATO’s fixed-rate claim.
- Set your usual week
- Days fill in
- Fix the odd day
- Confirm the month
Quick start
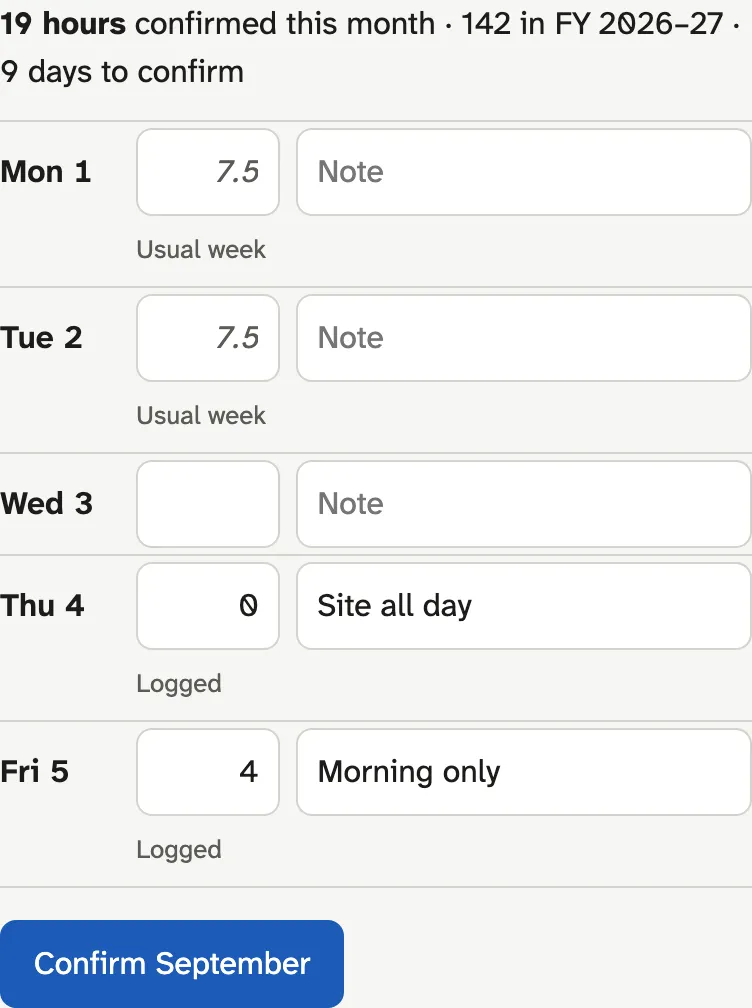
- Open Usual week, tick the days you usually work from home, set the hours, Save usual week.
- Each month, check the days. Clear a day you didn’t work from home; add hours to one you did.
- Tap Confirm for the month. Only confirmed hours count.
Why confirm?
The ATO wants a record of the hours you actually worked, kept as you go. A usual week is a starting guess; confirming a month says you checked it.
Other months
Previous and Next step a month at a time. The month picker jumps further back, as far as the start of last financial year.
Where it’s used
Confirmed hours go into the year-end details on Tax, at the ATO rate for that year.
Things claimed twice
If you also claim electricity or internet as their own expenses, Tax will point it out. The fixed rate already covers them.
What the rate covers
The hourly rate covers power, phone, internet, stationery and computer consumables, so don't claim those as well. A desk or computer goes in the asset register.
Keep one bill for each of them anyway. You're not claiming them separately, but the ATO asks you to show you actually paid them. One power bill, one phone bill, one internet bill and one receipt for stationery, kept for the year, is enough.
Depreciation
What your equipment gives you as a deduction this year, under the simplified rules for small business.
Quick start
- Clear Needs attention: assets missing a purchase date or value aren’t counted.
- Read the year: what’s written off, and the small business pool.
- If you had a pool before using this site, enter its opening balance under Pool balance brought in, for the first year you want worked out here. Your accountant has the figure. Equipment bought before that year is taken to be in it.
The short version
- Under the instant asset write-off threshold: the whole cost is deducted in the year you bought it.
- Over it: it goes into the small business pool and is deducted a bit each year.
- Only the business-use share counts.
Selling equipment
- Sold something that was written off? The sale price is income.
- Sold something in the pool? It comes off the pool balance. Anything above the balance is income.
Record a sale on the asset itself. These figures also appear on Tax.
Jobs
Everything about a piece of work in one place: the request, sketches, quote, receipts and invoices.
- Request
- Photos and sketches
- Quote
- Accepted: the job is on
- Invoices
- Done
Quick start
- Someone asks for a price? New request.
- Work that’s already agreed? Add job.
- Tap a job to open it.
How the list is grouped
- Requests: asked for, or quoted and waiting for an answer.
- Jobs: work that’s on, latest due date first.
- Done or not going ahead: folded away at the bottom.
Each job shows its dates, quoted price, and what’s been spent on it so far.
A job or request
The details, pictures, drawings, quote, and money for one piece of work.
Quick start: a new request
- Say what they’re asking for, add a description, and the Customer.
- Next: photos and sketches. Take photos on site, or draw a sketch to quote against.
- Next: the quote. The customer and description carry over.
The step bar at the top shows where you are. Tap any step to go back to it. Nothing is final until you issue the quote.
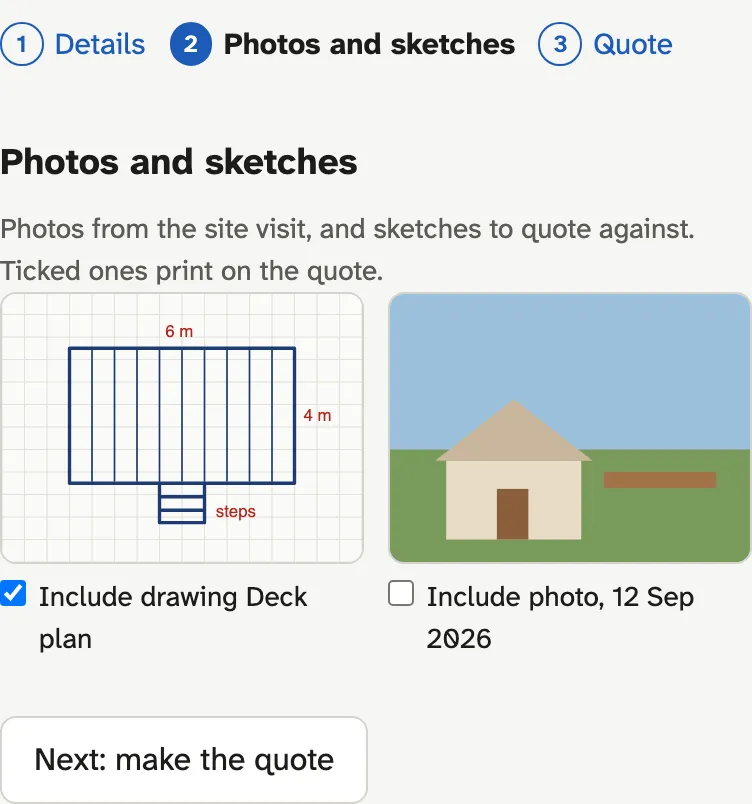
Save and finish later keeps it as it is. Requests wait on the Jobs page.
Customer
Pick someone From the address book, or type their details. Quotes and invoices for this job start from them.
Pictures and drawings
- Take photo or Add pictures for photos.
- New drawing for a sketch, over a grid or a photo.
- You choose which ones print when you make the quote.
- twice deletes one.
When it’s accepted
Marking the quote accepted puts the job on: it moves from Requests to Jobs, with the quoted price filled in. Declined requests fold away under Done.
Money
- Receipts with this job in their Job field. Put one on a job with its Job field.
- Bank transactions put on this job with the Job picker on the Bank page.
- Invoiced, Paid, Owed from the job’s invoices.
A bank line paid by a receipt that’s already listed counts once.
Assets used
Note which tools or equipment went on the job. Find one by name or code, or scan it.
Done
Tick Job done and save. It folds away on the Jobs page but keeps everything.
Drawing
Sketch plans and ideas with a stylus or finger, over a grid or a photo.
Quick start
- Give the drawing a name.
- Draw. Pen and Eraser are at the top.
- Tap Done. It saves as you go, so Done just takes you back to the job.
Stylus and fingers
Once you use a stylus, fingers only move and zoom. Rest your hand on the screen as you would on paper.
- Two-finger tap: undo. Three-finger tap: redo.
- Pinch to zoom, or . shows the whole drawing.
- No stylus? Draw with finger.
Pen
- Pick a colour. To change a colour, select its circle, then tap +.
- Pen width sets the line.
- Pen feel sets how pressing harder widens or darkens the line. Draw a test line and adjust. It’s kept on this device.
Background
- Image: draw over a site photo from the job. Or import one; it’s added to the job’s pictures.
- Show grid lines, with spacing and colour, for plans to scale.
Full screen
Full screen hides everything but the drawing. brings it back.
When things go wrong
- Lost signal: keep drawing. Changes are kept on this device and saved when you’re back online.
- Offered to restore changes: they were kept on this device from last time. Restore them, or Discard.
A quote
A price for a job, with your sketches on it. The same lines and layout as your invoices.
- Draft
- Issue
- Send
- Accepted
- Deposit
- Progress
- Balance
Quick start
- Prepared for: pick from the address book, or type their details.
- What it’s for: a few words, shown at the top of the PDF, in the email, and on invoices made from the quote.
- Lines: description, quantity and price, before GST.
- Sketches and photos: tick the ones to print, from the job.
- Save and preview PDF to check it. Then Issue quote.
Issue quote waits for you
It stays greyed out until the quote has someone to go to, a date, and at least one line with a description and price. The note under it says what’s missing.
Once it’s issued
It gets its number and is locked, so what the customer saw never changes. Need changes? Copy to a new draft, change it, and issue that.
Download PDF, or send it from the Email section with your own wording.
The customer’s answer
- Mark accepted with the date, their name, and a signature if they sign on your tablet.
- Changed their mind? The answer can be corrected.
- Accepting puts the job on.
Invoicing from the quote
- A deposit of a percentage, then progress payments, then the balance. Each is worked out from the quote.
- The invoice is made as a draft, so you can check it before issuing.
- The button waits if the percentage is more than what’s left. The note tells you how much is.
Terms
Put the deposit you ask for, or what isn’t included, in Terms. Quotes are valid for the days set in Sales settings.
Sales
Money coming in: your invoices, the receipts you give customers, your quotes, and what you’re owed.
Quick start
- First time? Fill in Sales settings: your business, logo and payment details.
- Pick Invoices, Receipts (for a sale already paid) or Quotes at the top, then New.
- The total at the top is what’s owed, across your unpaid invoices.
The tabs
- Invoices: drafts, issued, overdue, paid, void.
- Receipts: receipts you've given customers, for sales already paid and for payments on an invoice.
- Adjustment notes: what came off an invoice after it was issued, and why. The tab appears once you've made one.
- Quotes: drafts, issued and waiting, accepted, declined.
Also here
- Address book: the people and businesses you bill.
- Sales settings: layout, numbering, terms, email wording.
An invoice
Build it, check it, issue it, send it, and see when it’s paid.
- Draft
- Preview PDF
- Issue
- Send
- Paid
Quick start
- Bill to: pick from the address book, or type their details. Start typing an address and pick it from the list. Tick Save to address book for next time.
- What it’s for: a few words, like “bathroom tiling deposit”, shown at the top of the PDF and in the email.
- Lines: description, quantity and price, before GST. GST is worked out as you type.
- Save and preview PDF to check it in a new tab.
- Issue invoice, then Download PDF or send it from Email.
Issue invoice waits for you
It stays greyed out until there’s someone to bill, a date, and at least one line with a description and price. The note under it says what’s missing. Issuing asks you to confirm, because it can’t be undone.
Once it’s issued
It gets its number and is locked, so what the customer received never changes.
- Need changes? Copy to a new draft, then void the old one.
- Void invoice keeps its number, and the PDF is marked void.
Void it, or adjust it?
Two different things, and which one is right depends on whether you've lodged the BAS that the sale's GST went into.
- Void is for an invoice that was never a real sale: sent to the wrong person, a duplicate, a job that never began. It erases it.
- An adjustment note is for a sale that did happen and then changed: a refund, a discount you agreed afterwards, goods returned, a job cancelled once it was invoiced. It leaves the invoice standing and records what came off it.
Once the BAS is lodged the GST is already reported, and so is the credit your customer claimed, so erasing the invoice leaves the two of you disagreeing. The page offers the right one: an invoice in a lodged period leads with Make an adjustment note and keeps Void behind an explanation.
Adjustment notes
From an issued invoice, Make an adjustment note. You give three things: how much the price came down by (including GST), the date, and why: the ATO asks for the reason on the note itself, so "One tile returned" or "Agreed discount", not blank.
The GST in the adjustment is worked out from the invoice, in proportion, so it always matches what was charged. The note gets its own number, an A series, so your invoice numbers stay unbroken. It can't come to more than the invoice, counting any notes you've already issued against it.
Paperwork, not money. The refund leaving your bank is what changes your BAS figures. The note is what your customer needs to correct theirs. Counting both would correct it twice.
A receipt for a sale already paid
Receipts, then New receipt, on the Sales page is the same form for a sale that's been paid: cash, card, a transfer, or a mix.
- Who it's from, the lines, and the Date received.
- Payments received: how they paid and how much, say Cash $150 and Card $300. They have to add up to the total; Issue receipt waits until they do.
- Issue it, then Download PDF or email it. It's numbered in its own series, like R2609.001, so your invoice numbers stay unbroken. If you're registered for GST it's titled Tax invoice / Receipt.
A receipt isn't income by itself. It counts once the money is in the bank (on the Bank page, link the card payout and the banked cash to the receipt), or once you say the cash was spent or kept.
Getting paid
When the money arrives, link the payment on the Bank page: open the line and choose the invoice it paid. It then shows here as paid, or how much is still owed.
Paid in stages
A deposit, 50% on completion, then the rest? Give a receipt for each payment, all tied to the one invoice.
- Invoice
- Deposit receipt
- Progress receipt
- Final receipt
- Paid in full
- On the issued invoice, Give a receipt for a payment.
- Say how much they paid this time, and how. A note like “deposit” helps.
- Issue receipt. It waits if the payment is more than what's still owed.
Each receipt lists every payment so far and what's still owed. The last one says Paid in full.
- Already in the bank? Use the next to that payment under Payments. The receipt takes over that bank line, so it's only counted once.
- One document for the whole job? Once it's paid in full, Download receipt gives the invoice marked paid, with every payment listed.
Cash that never reaches the bank
Cash counts as income once it's accounted for, dated the day you got it. On a receipt with cash, Where the cash went keeps track:
- Banked: link the deposit to the receipt on the Bank page.
- Spent on a purchase: pick the purchase's receipt, say the Bunnings run it paid for. The purchase still counts as an expense.
- Kept, not banked: counts it now.
The Tax page lists any receipt whose cash isn't accounted for yet.
Chasing payment
Overdue? Send a reminder opens your own email app with a polite reminder written for you: the amount owing, the due date and your bank details. Nothing is sent until you press send. It needs the customer's email address on the invoice.
GST
If you’re registered, invoices are titled Tax invoice and add 10% GST to taxable lines. Untick GST on a line for anything GST-free. Not registered: no GST is shown. Set this in Tax settings.
A tax invoice has to show your ABN, or your customer can't claim the GST on it. If you're registered and haven't set one, the invoice won't issue until you add it in Sales settings.
Terms
Leave Payment terms empty to use the ones from Sales settings, or write terms just for this invoice.
Sales settings
Your details as they appear on every invoice and quote. Find them under Settings, Sales.
Quick start
- Your business: name, address, ABN, phone, email, logo.
- Payment details: account name, BSB and account number, PayID if you use it, and your payment terms.
- Invoices: days until due, how long quotes are valid, layout and numbering.
- Save sales settings.
Your logo
Logo takes a PNG or JPEG, shown at the top of every invoice and quote. Remove the logo takes it off. Layout sets where it sits, for invoices, receipts and quotes alike:
- Logo left: logo top left, your details in the middle, the invoice number and who it's for on the right.
- Logo centred: logo across the top, with the invoice number, your details and your contacts in a row below it.
Both put the payment details in a box at the foot, which never splits across pages. Example invoice and Example receipt open a PDF of the layout chosen above, with your saved details. A receipt shows what was paid in place of how to pay, so it has no bank details.
Footer line is a short line printed at the bottom of every page, under your business name, ABN and contact details: a licence number, say.
What changes when
Changes apply to invoices issued from now on. Issued invoices keep the details they were issued with.
Registered for GST (in Tax settings)? Invoices are titled Tax invoice and add 10% GST to taxable lines. Not registered? No GST is shown.
Numbering
- Year and month: 2609.001, 2609.002, starting again at 001 each month. Quotes get a Q in front.
- A plain running number: set the first number if you’re carrying on from an old system.
Email wording
Write your own subject and message, or leave them empty for the standard wording. There are two messages: one for a named contact, one for a business with no contact name. The placeholders under Placeholders you can use fill in the details, like {{firstname}} or {{total}}.
Address book
The people and businesses you quote and invoice.
Quick start
- Add contact, or tick Save to address book on an invoice or quote.
- Tap a contact to change their details.
- Pick them From the address book on a job, quote or invoice.
Addresses
Start typing an address and pick it from the list: it fills in both lines. You can still type it yourself or change what's filled in.
Suggestions near you come first. The first time, your browser may ask to use your location: say yes for the closest matches. Either way they start near your area or your business address.
Changing a contact doesn’t change invoices already issued. They keep the details they were sent with.
Assets
Your equipment register: what you own, what it cost, and what paid for it.
Quick start
- Add asset, or use Add to assets on a receipt or bank line.
- Find one by typing its name, serial or code.
- Scan barcode or Tap NFC tag to find one with the phone.
Scanning
- Barcode scanning works on iPhone and Android.
- NFC tags work on Android only.
- One read per scan or tap, so it won’t fire twice.
Depreciation
Depreciation shows what this year’s deduction is. Assets need a purchase date and value to count.
Excel
Export to Excel saves the register, including what was disposed of.
An asset
One piece of equipment: its details, codes, what paid for it, and photos of its condition.
Quick start
- Name, Purchase date, Value (what you paid, including GST).
- Business use: 100 unless it’s partly private.
- Save asset.
Codes
Add a Barcode ( Scan) or an NFC tag ( Tap tag, Android only). Then you can find it on the Assets page, or add it to a job, by scanning.
Paid by
Once there’s a purchase date, choose the receipt and bank line that paid for it. Near dates are offered first.
Photos
Take photo or Add photos. Each has a date and a comment, so you can show its condition over time.
Reminders
Servicing, test and tag, calibration, warranties: add them under Reminders with their due date and how often they come round, say every 6 months for a service. Home reminds you a month before. Done moves one on by its repeat. Add a cost and Home works out what to put away each month.
Selling or scrapping it
Under Sold or scrapped, set the status, date and sale amount, and pick the bank line the money came in on. Depreciation takes it from there.
How it's claimed
Under each asset's value, one line says how it's claimed. Equipment under the small business limit is written off in the year you bought it. Dearer things go into the *small business pool*, which is claimed a share at a time. Something bought before the years worked out here belongs in the pool balance you bring in on the Depreciation page.
Vehicles
A logbook for each vehicle, so only the business share of its costs is claimed.
Quick start
- Add a vehicle with its registration and a description.
- Open it and Add journey after each trip.
- Or print a QR code for the car, and log trips from any phone.
A vehicle
Its journeys, its business use, and who can log trips in it.
Quick start
- Add journey after each trip.
- Check the business share it works out.
- Export logbook to Excel for a financial year.
The 12-week logbook
Keep every trip for 12 weeks in a row. The business share from those 12 weeks can be used for five years. Only that share of the vehicle’s costs is claimed.
The share is your business km over everything the car drove, which the odometer knows whether or not a trip was logged. So km the odometer moved with no journey against them count as private, and the page says how many there were. Km another business drove are shown too: they are part of the same total, and not part of your claim. Logging the private trips doesn't lower your claim; leaving out the business ones does.
Cents per km
For cars, you can claim a set rate per business kilometre instead, up to the ATO limit. A car here means one built to carry under a tonne and fewer than nine people; a bigger ute or van has to claim its actual costs from the logbook. If the app has no rate for the year yet, nothing is claimed this way until you add it under ATO rates in Tax settings. The Tax page compares the two, and you pick one. It covers all the car's running costs, including depreciation, so those aren't claimed as well. GST credits on its costs still follow the logbook; your accountant should confirm them for a car claimed this way.
Sharing
Who can log journeys is one list, and three ways to add to it. There's no switch to turn sharing on: the car is shared because something in that list is.
- Add person, by the email they sign in with. They need an account here with that email (the site is invite only). They can add journeys and change their own.
- Make a QR code, then Print or Download it. Anyone who scans it can log trips without signing in, and change their own for a few days. They can't see anyone else's. A car can carry several at once: a sticker on the dash, another for the glovebox. Making a new one leaves the others working.
- Set a PIN, four digits. A driver with no scanner goes to the sign-in page, follows Use its registration and PIN, and types both. The same as a QR code from there on.
Every row has an On/Off. Off stops that person, code or PIN without deleting it, so a driver can be stood down for a while and brought back without retyping anything. The removes it for good.
If they run their own business, a trip they log counts as their business, not yours, and each of you claims your own share of the same car. Editing a journey somebody else logged, you can tick Counted as this car's business when the driving was for you after all.
Wrong PIN tries
Four digits is short, so tries are counted: after a dozen wrong ones an address is turned away for a while, and a right one clears the count. If wrong tries pile up against your registration the page says so, and you can change the PIN or switch it off.
Reminders
Keep registration, insurance and service dates under Reminders, each with how often it comes round. Home shows each one a month before it's due. When it's done, tap Done and it moves on by its repeat. Change sets a different date, repeat or cost. Give it a cost and Home works out what to put away each month.
Deleting
A journey: twice. The vehicle: Delete vehicle, which removes all its journeys too.
A journey
One trip: when, where to, why, and the odometer at each end.
Quick start
- The date and Start km are filled in from the last trip.
- Add a Description: where and why, like “Client visit, Smith St”.
- End km starts with the right first digits. Add the last three, or photograph the odometer and it’s read for you.
- Business or personal, then Add journey.
Tips
- The description is what the ATO looks for: “Site visit, Smith St” beats “work”.
- Not there yet? Save without the end reading and add it when you arrive. The trip waits at the top of the form, and isn’t counted until it’s finished.
Log a journey
Log a trip in a shared vehicle from its QR code, without signing in.
Quick start
- Type Your name or initials the first time.
- The date and Start km are filled in from the last trip.
- Add a Description: where and why, like “Client visit, Smith St”.
- End km starts with the right first digits. Add the last three, or photograph the odometer and it’s read for you.
- Business or personal, then Add journey.
Tips
- The description is what the ATO looks for: “Site visit, Smith St” beats “work”.
- Not there yet? Save without the end reading and add it when you arrive. The trip waits at the top of the form, and isn’t counted until it’s finished.
Your trips
Added from this phone lists what you’ve logged. You can change them for a few days after adding them. You can’t see anyone else’s trips.
When things go wrong
- It won’t open: the QR code may have been replaced or stopped, or the vehicle isn’t shared any more. Ask the owner.
- Changed phone or cleared the browser: new trips still work. Earlier ones can’t be changed from the new phone.
To-do
The thing you'd otherwise write on the back of an envelope. Your list is your own: nobody you share the account with sees it unless you hand them a task.
- Type it
- Press Enter
- Tick it when it's done
- It files itself away
Adding
Type what needs doing and press Enter. Shift+Enter starts another line, so a task can carry its own short list, and the box grows as you write.
Under the box, Project and Due set those while you're there; leave them alone if you don't want them. The project stays chosen for the next one, the date doesn't. Show and Order beside them narrow the list and sort it, and take effect as you choose.
Two shortcuts while typing, both optional:
- Start with (A) to put it first. (B) and (C) follow it; anything without a letter comes after. Lower case counts too. Writing a lettered list ((a) on the first line, (b) on the second) means those are your subtasks, so nothing is taken off the words.
- End with +name to put it in a project, if you'd rather type than pick: "Ring the framer +Gallery". A name with a space in it is fine, and a project you haven't used before is made for you. It's only read when Project is left at None.
Each new task goes to the top of Active, so the newest thing is the first thing you see.
Active and Backlog
Active is what's on now. Backlog is what's waiting. The chevron at the end of a task opens it, and so does a tap on its words: inside are the words themselves, the project, priority, which list it's on, and the start and due dates. Changes save as you make them. For appears once somebody else has access to the account.
Putting them in order
The list is in your order within each priority. Drag a task by the grip at its left to move it, or to move it between Active and Backlog. Nothing moves while you drag: a line shows the gap it will drop into, and it goes there when you let go. Let go somewhere with no line and nothing changes.
A task takes the priority of the ones it lands among, so where you put it is where it stays. Drop an ordinary task among your (A) tasks and it becomes an A.
From the keyboard, or on a screen reader: hold Alt and press Up or Down on the grip. Past the end of a list it crosses into the other one.
Ordering by Due date puts the list in date order, so there's nothing to arrange by hand; choose Order: Priority to drag again.
Ticking one off
Tap the circle. The task stays where it is for the rest of the day, crossed out, so tapping again undoes it. After that it's on the Archive tab, where you can still put it back.
Projects
Your own names for things, each with a colour used as a dot beside the name, so you can pick a project out of the list at a glance. Every job that isn't finished is on the same list, so a task can belong to a job. Open Projects at the foot of the Tasks tab to add one, change its colour or delete it. Deleting a project leaves its tasks alone; they simply have no project.
Show narrows the list to one project, and Order sorts by priority or by what's due first. Both sit beside the add box.
On a job
A job's page has its own To-do, so you can write down what's left without leaving the job. Those tasks are on your main list too, marked with the job's name.
Handing one to someone
Set For to anyone who has access to this account. They see the task on their own list, and either of you can tick it. Only the person who wrote it can delete it.
Some people can also hand a task to someone in another business, where that's been set up for them. A task handed over like that follows the person it's for: it shows on their own list wherever they're working, marked From whoever sent it and Another business. They can tick it, change the words, or hand it back to the sender; it then leaves their list. Nobody else sees any of it.
Formatting
B, *I*, underline, strikethrough and bullets, in a task or in the scratchpad. Ctrl+B, Ctrl+I and Ctrl+U work too (⌘ on a Mac). Without JavaScript the box is a plain one and your words are kept as typed.
On the home page
Add task takes you straight to the box, and the To-do card shows the next few active tasks with their project and due date. Tap one and it opens on this page, ready to change. Ticking them off happens here.
With no signal
The To-do page opens on a phone with no signal, from the copy your phone keeps, and it says so at the top.
What you do there is kept on the phone and sent the moment you're back on: a task you write (it sits under Waiting to send until it lands), one you tick off, and changes you make to a task's project, priority or dates. Nobody has to press anything, and closing the app doesn't lose them. Changing the same task twice before you're back on sends what you wrote last, once.
Two things do need signal: the scratchpad, and dragging tasks into a new order. Sign out asks first while anything is still waiting; it's kept either way, and sent when you sign in again.
Import and export
Import or export (todo.txt) sits at the foot of the Tasks tab. todo.txt is a plain text list, one task to a line, that most other to-do apps read and write.
Download todo.txt gives you your list: Active, then Backlog, then what you've ticked off. Priorities, projects, start and due dates go with it. What the format has no room for is left out: bold and bullets, who a task is for, who it came from, and the order you've dragged them into. A task on a job carries the job's name as its project.
Import a todo.txt file adds its tasks to the bottom of your list. A project it names is made for you, and +Gallery-Wall finds your Gallery Wall rather than making a second one. A line already on your list, word for word and due the same day, is left as it is, so importing the same file twice doesn't double anything. A line marked x arrives ticked off. Up to 500 lines and 256 KB at a time.
A line can carry more than we keep: another @context, another key:value. Those stay in the words of the task, so nothing in the file goes missing.
Scratchpad
One box for anything that isn't a task yet. It saves as you write.
History
Who changed a record, what they changed, and when. Newest first.
Quick start
- Open a receipt, invoice, quote or asset and tap History at the bottom. For a bank line, it's in the line's More panel. Tax settings and each year's Year-end details on Tax have one too.
- Each entry says when, who, and what changed: the old value, then the new one.
What's kept
- Receipts, bank lines, invoices, quotes, assets and lodged BAS records.
- Tax settings and each year's year-end details.
- Who has access to your account: who was added, changed or removed, and by whom. Only you see this one, from People with access in Settings.
- A deleted record stays in the history as it was, so nothing disappears without a trace.
Nobody can edit or delete the history, including you.
Who sees it
Anyone who can see the record. Your accountant sees the history of the areas you've shared with them.
Not here
- Bank lines as they're imported: the import itself is the record.
- Changes from before 18 Sep 2026.
Settings
Everything you set once, in tabs: Business, Tax, Sales, Categories, People and You.
Quick start
- Business: give your account a name, usually the business name. It’s what people you share with see. Set its Timezone too: it decides what “today” is for new receipts, working from home and BAS dates.
- Tax: GST, how often you lodge BAS, and your business structure.
- People: add your accountant or bookkeeper.
- You: hide the areas you don’t use from your menu, and pick your colours.
People with access
Add someone by the email they sign in with, then choose for each area: No, Read-only or Yes (can make changes).
- Read only suits most accountants.
- Full access and Read only set every area at once.
- Remove takes their access away. Nothing of yours is deleted.
- History, at the foot of the list, shows who was given access, changed or removed, and when.
Name your account on the Business tab first: it's how they tell your account from others'. Once it's shared, the name can change but can't be left empty.
They need a login on this site. An accountant or bookkeeper can create a free one; the page shows the link to send them.
Your menu
Untick an area to hide it. Its records stay, and it can come back any time. Expenses, Bank and Tax always show where you have access.
Reminders
Things the business has to keep up with that aren't a vehicle or a piece of equipment: business name registration, your website and domain, insurance, a workplace fire inspection. Add each with its due date, how often it comes round and, if you know it, the cost. Home shows it a month before, and Done moves it on. With a cost, Home also works out what to put away each month. Only you see these.
Your data
Export everything makes one ZIP of all your records. See Export everything.
Your records stay while your account does. Anything you delete is gone straight away, photos included. To close the account, export first, then ask: see Taking everything with you.
Colours
Calm swaps white and grey for soft blues, greens and warm neutrals, easier on tired eyes. It’s for this device, in light mode. The button at the top switches light and dark.
Accountants
If you work for clients, set Your practice name. Clients add you by your sign-in email, and you switch between them on Home.
Export everything
All your records in one ZIP: spreadsheets, data files or a todo.txt list, with the photos and PDFs in folders.
- Choose what to include
- Make the export
- Leave if you like
- Download ZIP
Quick start
- Tick what to include. Everything is ticked to start with.
- Tick the formats you want. Excel is ticked to start with.
- Make the export.
- When it’s ready, Download ZIP.
Formats
The same records, written for whoever is reading them.
- Excel spreadsheets: a workbook for each part, opening in Excel, Numbers or Google Sheets. This is the usual one.
- JSON data files: the records exactly as they're stored, one file for each kind, in a JSON folder. For moving your data into something else, or keeping a copy a program can read.
- todo.txt: your to-do list as a todo.txt file, which other to-do apps read. It covers the To-do part only. See To-do.
Tick as many as you want; they all go in the one ZIP.
Big exports
Lots of photos take a few minutes. You can leave the page while it builds: come back from Settings › Business › Your data.
How long it’s kept
The ZIP is kept for 48 hours after it’s ready, then deleted. Make a new one whenever you like; it replaces the old one.
What’s inside
What's in each on the page lists the files each part makes, and a README in the ZIP explains the folders and sheets. If any stored file was missing from the server, the README lists it.